|
| ||||
| Framesets and Frames | ||||
|
Framesets and Frames refer to a special type of html coding that subdivides the browser window into "frames", each of which may contain a separate html page. This allows multiple pages to be displayed, and also, one or more of the frames within the page may scroll or change to another page while the other frame(s) remain unchanged. A common layout for a frameset that you've probably seen is where a "banner" or title bar is fixed on top of the window and a navigation bar is on the left with links that change the main or middle frame's content. The frameset is created with <frameset> and <frame> tags that contain the information about location, sizing, and behaviors of the inserted html documents. The frameset page's html is different than a normal web page in that it doesn't, in and of itself, contain any content that displays in the browser window. It only creates the set of frames, their sizes and locations, and specifies what regular html pages will go into each frame. So, instead of a <body> section that normally would contain displayed page content, the <frameset> tags will take the place of the normal body section: <html>
<frameset + attributes > </html>
|
||||
| cols and rows | ||||
|
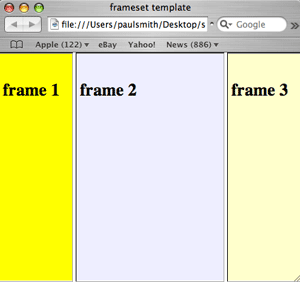
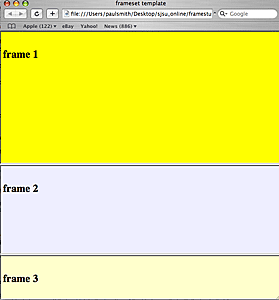
Although the concept of rows and columns to define layout is also used to define table cells, the syntax for defining rows and columns in framesets is not the same. When creating a set of columns ("cols") , the value of the width (in pixels or as a percentage of the window's width) is given for each column, separated by commas like this: <frameset cols="100, 200,100"> This
example creates a frameset of 3 columns, from left to right;
As
you can see by the example, every "cols" value creates its own
column. <frameset rows="300, 200,100">
The values of the cols width (or rows height) can be either "absolute" pixel values as shown in the previous examples, or may be percentages. Also, an asterisk may be used to denote a column or row without designating a specified width or height: absolute values: <frameset cols="400,300"> (2 columns; 1st column is 400 pixels wide, and the second 300 pixels wide)percentage values: <frameset
cols="25%,10%,65%"> (3 columns; 1st column is 25
percent of the browser window width, etc.)
|
||||
| The <frame /> tag | ||||
|
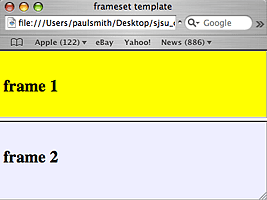
After the layout has been defined by the frameset's cols or rows, then each new area must be described with its own <frame /> tag, which is a single object and so must have the space-forward-slash as an xhtml empty tag. Each <frame /> tag must include a src attribute which is the location of the html page that will display in that frame. <frameset rows="100, 200"> <frame src="page1.htm" /> <frame src="page2.htm" /> </frameset> As you can see, in order for the frameset to work properly, you must have not only the frameset page but, also one page for each frame:
|
||||
| Subdividing a frame with another frameset | ||||
|
Once you have divided up the browser window space
with rows or columns, you can subdivide any frame by eliminating it and
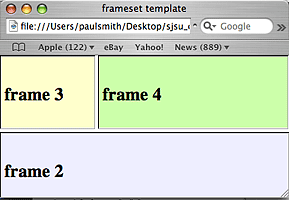
substituting a frameset (and its accompanying frames/pages) in its place: You should note that the new frameset has the opposite cols/rows attribute that the frameset it is nested inside of has. In this last example, the original frameset creates rows, and the first row frame is replaced by a frameset of cols:
|
||||
| Frame tag attributes | ||||
| There are several attributes
that we can add to the <frame /> tag:
frameborder The frameborder attribute can be used for
showing or hiding the borders in a frames construction: The marginwidth and marginheight attributes
define the margins in a specified frame; it is added to any margins that
have been defined in the page that will be placed in that frame. This attribute determines the availability of scrollbars for the individual frames. The 3 scrolling values allowed are "auto/yes/no". Scrolling is set by default in most browsers as "auto", where scrollbars will appear only if the user's browser window is cutting off the frame's content. If you don't want scrollbars to appear even if the content is clipped, then use this coding: <frame
src="webpage1.htm" scrolling="no" /> You can use this attribute if you don't want your visitor to be able to change the window's width or height. This is the same property as normal windows on your computer's desktop. If you want to change the size of a folder window on your desktop then you can do this by putting your mouse-cursor on the edge of the folder and then wait for arrows to appear. With these arrows you can adjust the size of the folder. This works for frames, too. You can test this property by first setting the frameborder="1" (in order to see the border of the frame); move the mousecursor on one of the borders so that you can see the arrow(s) - you should now be able to resize the frame. The noresize attribute is one of the older
legacy html attributes that had no quoted value. You may run across
older frameset pages that have the attribute noresize by itself in
the frame tag code. The xhtml version of this, and the one we will
always use, is noresize="noresize".
|
||||
| noframes | ||||
|
For users with browsers that
do not support frames*, those with only some very old browsers or with a
special "no-frames" setting, you can specify an alternate
content to display by using the <noframes> tag.
Nested within the <noframes> </noframes>
section, you can put in the body tags and display regular html; note that
none of this content will display if the regular frameset is read. Here is an example which tells the user that their browser doesn't display frames and gives them a link to an alternate page: <frameset ....... frameset coding....
<noframes> </frameset> *note: this noframes coding is
somewhat optional in 2006 as few people now have trouble displaying frames
but, it helps you to cover every user's situation. |
||||
| Targeting Frames | ||||
|
One of the best uses of framesets is to create a layout where one frame contains a page of links and those links, when clicked, change the pages of another frame. Some examples of framesets with targeted frames:
In order to "target" a frame and send a page to it, it must be named first. So the name attribute must be added to that frame's <frame /> tag in the frameset: <frame src="webpage1.htm" name="content1" /> To send a page from a link to a special "target", the target attribute must be added to that link's anchor tag: <a href="newpage.html" target="content1">Send newpage.html to the frame named content1</a> So, if the frames have been
named in the frameset, any link from any page and in any frame can send
the page indicated by its href value to any of the frameset's frames by
specifying the frame's name as the value of the link's target attribute. |
||||
| Special Targets | ||||
The following target names are reserved and have
special meanings:
target="_parent" will load the document into the immediate frameset "parent", or frameset that the current frame's frameset is nested in. This value is equivalent to _self if the current frame has no parent. | ||||


